AMAZON VENDORS: 4 STEPS FOR SUCCESS
Updated on April 7, 2024
It seems like there are a lot of tips, tricks, and warnings these days to help vendors boost sales on Amazon. But success as an Amazon vendor really comes down to a few basic actions that, yes, can help increase revenue, but can also help strengthen your company’s relationship with Amazon itself.
Vendor Velocity has specialized in helping Amazon vendors find success for over 15 years — and we’ve managed to boil down that many years of successful experiences to just four simple steps. Read on to learn more!
4 Things Top Amazon Vendors Do
- Enroll in the Amazon Brand Registry
- Create High-Quality Detail Pages
- Defend the Buy Box
- Advertise on Amazon
Becoming an Amazon Vendor
Amazon distinguishes between vendors and sellers, offering different types of agreements to satisfy different types of business models.
An Amazon vendor is an individual or business that sells high volumes of product directly to Amazon. This contrasts with an Amazon seller, who sells directly to the customer. In essence, Amazon vendors are the wholesale manufacturers, distributors, or suppliers who use Amazon Vendor Central to manage their own inventory (and a lot of it).
Unlike Amazon sellers, Amazon vendors must maintain a close relationship with Amazon (i.e., close adherence to Amazon’s vendor standards) to succeed on the e-commerce platform; in fact, you can only become an Amazon vendor if the Amazon retail team invites you to participate. It’s a company-to-company relationship that requires trust from both parties — established first during your time as an Amazon seller, and strengthened only after some time as an Amazon vendor with a registered brand.
1. Enroll in Brand Registry
The number one most important thing any vendor can do is enroll in Amazon’s Brand Registry. Period.
On March 9, 2019, Amazon sent an email to their vendors stating that Amazon prefers to source products directly from brand owners. This message encouraged vendors to register their brand(s) in the Amazon Brand Registry, going on to say that Amazon’s automated ordering system would only continue to place orders for registered brands. The Brand Registry is not an option for vendors … it is a necessity.
Brand registration is simple; the main thing a vendor needs to meet Brand Registry eligibility requirements is a trademark for their brand. In the United States, that would be a trademark issued by the US Patent and Trademark Office.
Enrolling in the Amazon Brand Registry offers several benefits for Amazon vendors. Not only does having a registered brand prove the legitimacy of your products, but it also unlocks certain Brand Analytics and reporting features that unregistered brands can’t access.
2. Create High-Quality Detail Pages
When it comes to product descriptions on detail pages, Amazon’s search algorithm favors content that follows their guidelines:
- Make sure your detail page content conforms to what Amazon is looking for.
- Keep titles brief and accurate.
- Make sure you’re using all bullet points and description spaces available to you.
- Check spelling and use accurate & popular keywords, but don’t engage in what’s known as “keyword stuffing.” Instead use the Hidden Keywords area to enter relevant keywords that aren’t mentioned anywhere else on the detail page.
“Keyword stuffing” means including a soup of incoherent keywords that do nothing to explain the product or its uses — all in an attempt to manipulate search functionality in your favor. According to Amazon, there is no need to mention a keyword more than once.
In addition to bolstering product visibility on search, Amazon vendors can also work to improve the customer’s experience once they’ve arrived on the product page:
Images
Images are important, and more is better. Amazon’s mobile platform can display up to six product images. Having a minimum of six images on a detail page should be every vendor’s goal — if including six images isn’t possible, then make sure there are never fewer than three. Image size is also important. When images with dimensions that exceed 1000 pixels on the shortest side are uploaded, the image zoom feature will become enabled for that image, allowing customers to look at the item in detail.
A+ Content
“Below the fold” a vendor has an opportunity to describe their product with rich, brochure-like content called A+ Content. There was a time not too long ago when Amazon required the vendor to pay a hefty fee for the privilege of presenting their product using A+ Content. Today, it’s free, and every vendor should take advantage of it — especially if the item is complex, technical, or carries a higher retail price.
Detail Page Organization
Finally, make sure all items are correctly categorized to the finest level that makes sense. Shoppers often use a combined search and browse approach to find what they are looking for. If you are selling socks that are incorrectly categorized in Kitchen, guess what will happen? (Hint: “Lots of sales” is not the answer!).
3. Defend the Buy Box
Now that your brand is registered, your detail pages are optimized, and your products are properly categorized, it’s time to defend your hold on the Buy Box.
The Buy Box refers to the “Add to Cart” and “Buy Now” buttons on each product detail page, found in the white panel off to the right. Amazon, or a marketplace seller, will ‘win’ the Buy Box if they have the best offer available to customers.
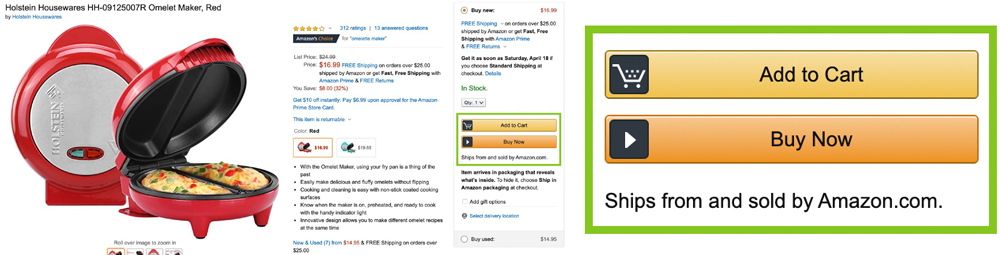
When Amazon has a direct relationship with a vendor, they expect to be able to compete favorably with other sellers of the same item. If Amazon can’t offer a competitive retail price (not necessarily a lower price) on your items, they will give the Buy Box to a Marketplace (third-party) seller and move the Amazon offer down to the less-visible “Other Sellers” area.
You may have guessed that Amazon doesn’t want to hang out in the “Other Sellers” section on items they have purchased from the vendor. If Amazon loses the Buy Box consistently on an item, they will mark the item as unprofitable and cease placing orders for it. That’s why maintaining Buy Box control is high on the priority list for vendors who wish to stay on top of their Amazon game.

4. Advertise on Amazon
The last simple play in the book is taking advantage of Amazon’s advertising opportunities. Sponsored Product and Sponsored Brand ads are the only way to ensure a vendor’s key items are appearing in the critical first page of search results. Your competitors are advertising, and you should be too.
There are many ways to utilize advertising dollars on Amazon, even for vendors with smaller budgets. Sponsored Product and Sponsored Brand ads can be set up and launched quickly, and they can really move the needle on sales.
Playing to Win as an Amazon Vendor
Taking these steps doesn’t just boost sales — it also builds your relationship with Amazon as an Amazon vendor, maintaining relevance and importance on the platform. From brand registration to native advertising, there are a number of things Amazon vendors can do to succeed … and if you need any help along the way, the Vendor Velocity team can point you in the right direction.
Give us a ring with your specific questions, or jump right in by requesting a free catalog assessment from Vendor Velocity below.
Media Contact: Steve Bell I am the CEO and Founder of two companies, Vendor Velocity and Seattle Content. Both companies have been in business for well over a decade with their mutual goal of making Amazon Vendors and Sellers more successful on Amazon. We have been doing Amazon pay-per-click Advertising since it began and have trained at Amazon’s campus in Seattle. Vendor Velocity is a registered Amazon Advertising API Developer and has developed proprietary in-house tools that allow us to optimize our clients advertising campaigns for maximum return. Steve@VendorVelocity.com (800) 247-0341